 Here’s an easy to follow step by step guide to help you get started with your own blog. Let’s jump right in!
Step 1. Create Your Domain Name & Get Web Hosting
Step 2. WordPress 101
Step 3. Beautifying Your Blog
Most links are affiliate links where I may receive a commission if you purchase. I have used all of the services listed and highly recommend them because I’ve found them to be very helpful. Fees are NOT increased to compensate me.
Step 1: Create Your Domain Name & Get Web Hosting
- Domain Name: this is the web address for your blog… where mine is MarketingChick.com.
- Think of as many name ideas that you can! Make it fun & easy to remember and try to find one that is a “.COM” as opposed to “.net” or whatever, because web surfers are most familiar with the “.com”. Oh, and avoid using hyphens (stay clear of: Marketing-Chick… M-a-r-k-e-t-i-n-g… you get the idea) or other NON-abc characters to keep your address easy to type, share, and remember!
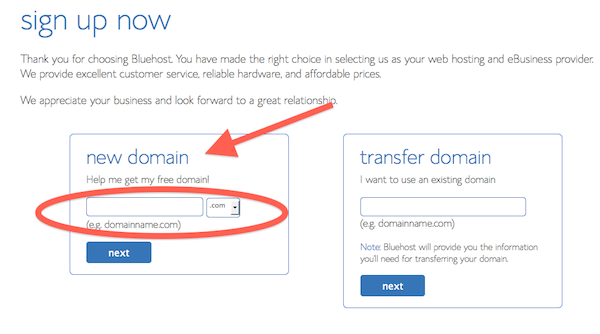
- Next, check to see which of those names are available. Do it quickly before someone else grabs the name you want! Get a FREE domain name with your BlueHost hosting plan!

- Get Web Hosting: you’ll need a place to host your domain. Think of it as the property on which you’ll build your home (blog).
- BlueHost is a web hosting company that’s very popular with new bloggers! They offer several incredibly affordable shared “unlimited hosting” plans as well as affordable VPS (Virtual Private Server Plans), so you’re covered when your blogs grows in popularity and you need to upgrade! Click here to register with BlueHost for $3.95 per month and get a FREE domain name!
- Looking for FREE hosting? You can get a free blog at blogger.com or wordpress.com, but you’ll be stuck with THEIR address (i.e. http://marketingchick.wordpress.com)… and that doesn’t look very professional. Plus, you get more options and flexibility with your own .com web hosting account. Of course, you can start with free hosting and migrate your blog to a paid server when it grows!
Step 2: WordPress 101
Now that you have your domain name registered and your hosting account setup, you’re ready to install WordPress. WordPress is the easiest and most versatile blogging software out there… and it’s FREE!
If your web host is BlueHost, click here to learn how to install WordPress on BlueHost!
Once your WordPress has been installed, go to: Settings > Permalink Settings > and change your permalink to “Post name” and save!
That’s it! Your blog has been installed!
Step 3: Beauty-fying Your Blog
At this point, you officially have you own blog! Wahooooo! How does it feel? Welcome to the blogosphere, my friend! You’re minutes away from sharing your “10 Steps to Whatever the Heck You Want to Share” with the world!
But before you begin typing away, there are a few things you can do to beautify your blog and customize it to fit your style. Yes, it’s time to pick your theme!
WordPress has a huge archive of free themes to choose from. Click here to check em all out.
If you’re looking for a premium theme, take a look at these three options I’ve personally used (and one I’m using right now!):
- The Genesis Framework… this is the framework I’m currently using for ALL my sites. Then check out the highly customizable StudioPress Themes after you install the framework.
- Elegant Themes… I love many of their designs, and they’re super easy to customize! I’ve used many of their themes before finally deciding on the Genesis Framework!
Once you’ve selected your theme, refer to the appropriate theme company for installation & customization instructions.
